Bettersize ST
- ● Self-Installation Overview
- ● Step 1-Installation Preparation
- ● Step 2-Unpacking
- ● Step 3-Instrument Connection
- ● Step 4-Software Setup
Installation of the Bettersizer ST Laser Diffraction Particle Size Analyzer is so easy. This article will walk you through the process of setting up your new Bettersizer ST. Follow the instruction in sequence to be sure that you understand all the steps.
Step 1- Installation Preparation
Before the installation, you need to confirm that the working environment is suitable for the Bettersizer ST. Make sure that the temperature of your lab is 10 - 30℃ (50 - 86℉). Besides, the humidity should be less than 80%. The input voltage of the Bettersizer ST ranges from 110 to 240V AC. For water supply and water drainage, you need to prepare two liquid containers, one is filled with clean water, which is utilized as a measurement medium; the other one is used for waste collection. Please do not connect the Bettersizer ST directly to the water supply with water pressure. Otherwise, the peristaltic pump may be damaged.
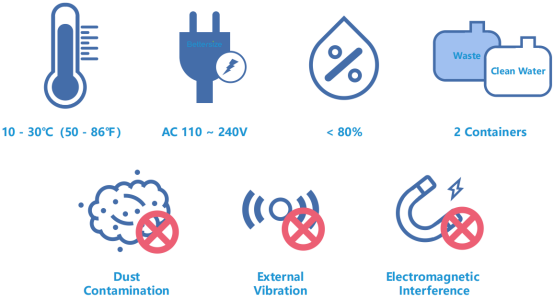
For better performance of the Bettersizer ST, external interferences should be avoided, such as dust contamination, external vibration, and electromagnetic interference.
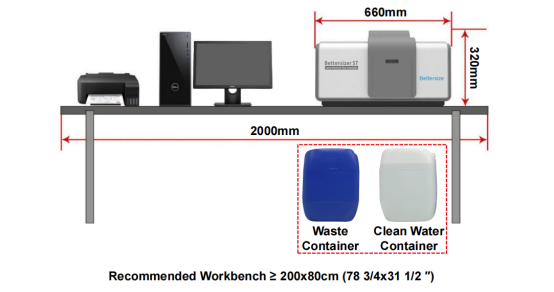
A rigid workbench for placement of the Bettersizer ST is necessary. It is suggested that the length and width of the workbench are larger than 200 and 80 cm (78 3/4x31 1/2 ″). We recommend placing the Bettersizer ST, computer, and printer in the order shown in the picture below. It is recommended that the computer is placed next to the Bettersizer ST for an easy installation. If the above-mentioned workbench is unavailable, please place the Bettersizer ST on your rigid workbench. Please make sure there is sufficient space for the two liquid containers under the workbench.
Step 2 - Unpacking
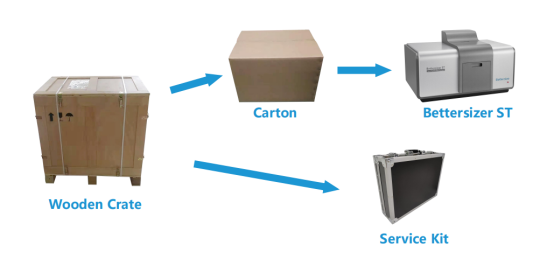
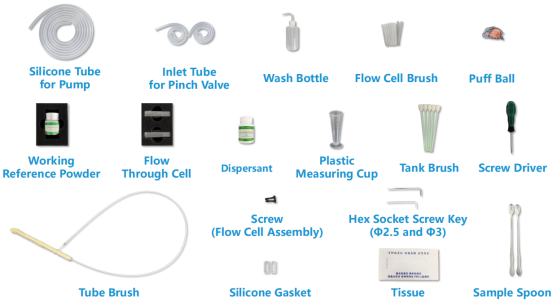
Please unlock the metal buckles on the side of the wooden crate and unpack the crate carefully. Then you will find a carton and a black service kit in the crate. Please open the carton and take the Bettersizer ST carefully. The black service kit contains various accessories for installation and maintenance.
For installation, make sure you have a Quick Guide, a Power Cord, a Power Adapter, a USB Cable, a Silicone Circulating Tube, a Silicone Drainage Tube, a Nozzle for Inlet Tube, and a USB Disk. For more details, please refer to the accessory checklist.
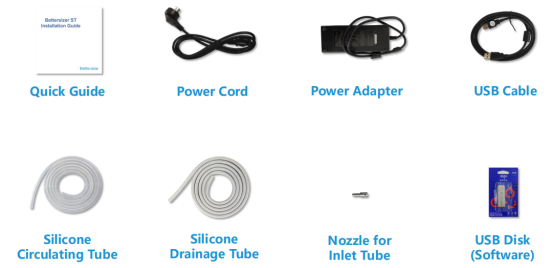
The rest of the accessories need to be kept in the service kit. Please place the service kit in your warehouse in case of instrument repair or maintenance.
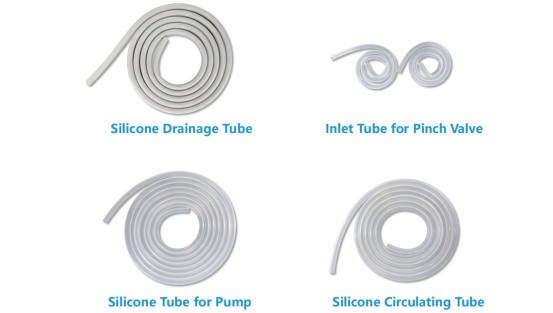
Please pay attention to the tubes. In the black service kit, there are four types of silicone tubes. The grey tube is used for water drainage (Silicone Drainage Tube). The two thin transparent silicone tubes packaged in an airtight bag are used for the pinch valve (Inlet Tube for Pinch Valve). The remaining two transparent silicone tubes are similar, the difference is the outer diameter. The one with a larger out diameter is utilized in the peristaltic pump (Silicone Tube for Pump); the one with a smaller out diameter is used as a water inlet tube (Silicone Circulating Tube).
Step 3 - Instrument Connection
In this part, you will connect the Bettersizer ST to the clean water container, waste container, computer, and power socket. Please follow the guideline in case of disconnection and move to the backside of the Bettersizer ST to start the connection.
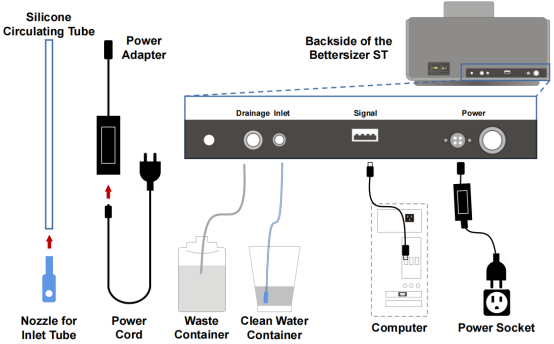
a. Connect one end of the Silicone Circulating Tube to the Inlet port; insert the Nozzle for Inlet Tube to the other end of the tube and place it into the Clean Water Container.
b. Connect one end of the Silicone Drainage Tube to the Drainage port; put the other end into the Waste Container.
c. Connect one end of the USB Cable to the Signal port; connect the other end to the computer.
d. Connect the Power Cord to the Power Adapter. Then connect one end of the Power Adapter to the Power port; connect one end of the Power Cord to a power socket. Please make sure that the flat side of the connector is on top.
Step 4 - Software Setup
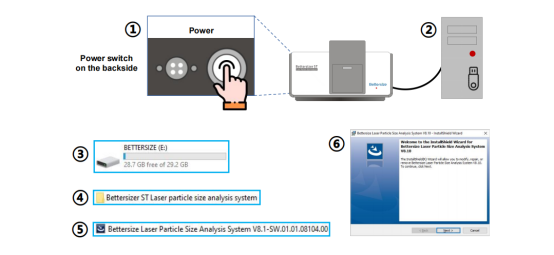
Once the instrument connection is completed, you need to setup the software. Switch on the Bettersizer ST and then the computer ①. Insert the USB Disk ② and double click the USB disk drive ③ and open the folder Bettersizer ST Laser Particle Size Analysis System ④, and then double click the setup program Bettersize Laser Particle Size Analysis System V8.1-SW.01.01.08104.00 ⑤. Finish the software setup according to the interface prompt ⑥.
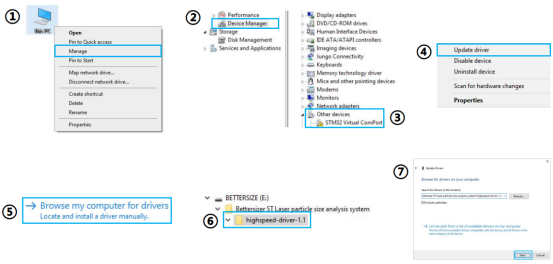
Then you need to update your driver. Right click This PC icon on the desktop and select Manage to display Computer Management window ①. Select Device Manager ②- Other devices - STM32 Virtual COM Port ③ and right click to choose Update driver to display Update Drivers window ④. Select Browse my computer for drivers ⑤ and then head back to the USB disk drive and select folder highspeed-driver-1.1 ⑥. Click Next to finish the driver update ⑦.
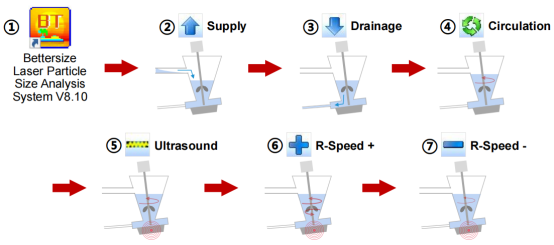
Last, test the system with the software to finish the installation. Launch the software Bettersize Laser Particle Size Analysis System V8.10 ①. Click the Supply ②, Drainage ③, Circulation ④, Ultrasound ⑤, R-Speed + ⑥, and R-Speed - ⑦ icons to check the software functions. Please kindly note that the circulation tank needs to be filled with water again before you click the Circulation icon. If the Bettersizer ST works properly, then the installation is finished.
Thank you for choosing this product. Feel free to contact us if you have any difficulties in the future.

